【SQL】UPDATE時、非NULL属性のみ更新する
テーブルのレコードを更新する時に値が非NULLの属性だけを更新したいケースが発生し、
少し考えた結果、以下のようなやり方に落ち着きました。
-- テーブル定義
CREATE TABLE HOGE {
 ID INTEGER NOT NULL,
 NAME VARCHAR(16),
 ADDRESS VARCHAR(64),
 DESCRIPTION VARCHAR(256),
 PRIMARY KEY (ID)
} ORGANIZED BY ROW;

-- 更新処理
-- :newName, :newAge, :newDescription, :id は更新値のプレースホルダ
UPDATE TABLE
SET
    NAME =
        (CASE
             WHEN :newName IS NOT NULL
             THEN :newName
             ELSE NAME
         END),
    AGE  =
        (CASE
             WHEN :newAge IS NOT NULL
             THEN :newAge
             ELSE AGE
         END),
    DESCRIPTION  =
        (CASE
             WHEN :newDescription IS NOT NULL
             THEN :newDescription
             ELSE DESCRIPTION
         END)
WHERE ID = :id;
更新対象のカラムに、CASE式の返り値を格納します。
上記SQLのCASE式内では、格納する値がNULLであるかどうかをチェックし、NULLであればカラム値を変更しないという処理を行っています。
SQLではCASEが式であるというのが重要で、CASEの返戻値が他の構文で評価できるので非常に便利です。
実際のケース
開発していたWebサービスのサーバがORマッパを使ってRDBを操作していたのですが、ORマッパで使うコンテナオブジェクトのプロパティがデフォルトでnullになっており、一部のプロパティ値だけクライアントから送信すると他のプロパティ値がNULLになってしまっていました。
上記のようなSQLで対応し、差分UPDATEに成功。
とりあえずは一安心。
【git】git diff にもっと詳しくなる
git diff
git diffは非常によく使うgitコマンドで、gitで管理されたファイルの差分をチェックするのに重宝しています。
ただ他にも使い方がないのか調べてみると、以外と使ったことがないオプションや引数指定の仕方がたくさんあったので、簡単にまとめてみました。
1. addしてないファイルの差分を表示
git diff
基本。デフォルト操作。
今いるブランチのHEADの状態と、アンステージング状態(addしてない)ファイルの最新状態の差分を表示します。
# hoge1.txt -> アンステージング状態
# hoge2.txt -> ステージング状態
$ git status
On branch master
Your branch is ahead of 'origin/master' by 2 commits.
  (use "git push" to publish your local commits)
Changes to be committed:
  (use "git reset HEAD <file>..." to unstage)

    modified:   hoge2.txt

Changes not staged for commit:
  (use "git add <file>..." to update what will be committed)
  (use "git checkout -- <file>..." to discard changes in working directory)

    modified:   hoge1.txt


# hoge1.txtの差分表示
$ git diff

diff --git a/hoge1.txt b/hoge1.txt
index 1e3893b..84ec994 100644
--- a/hoge1.txt
+++ b/hoge1.txt
@@ -1,3 +1,4 @@
 hoge
 hoge
 piyo
+foo
addされたファイルの差分を表示
git diff --cached
git diffのステージング版。
今いるブランチのHEADの状態と、ステージング状態のファイルの最新状態の差分を表示します。
# hoge2.txtの差分表示
$ git diff

diff --git a/hoge2.txt b/hoge2.txt
index 2262de0..e42f4ce 100644
--- a/hoge2.txt
+++ b/hoge2.txt
@@ -1 +1,2 @@
 hoge
+fuga
addされたファイル・されていないファイル両方の差分を表示
git diff HEAD
ファイルの現在の状態(ワーキングツリー)と最新のコミット(HEAD)との差分を表示します。
git diffとgit diff --cached両方の結果を合わせて見たいときに。
# ステージングされたファイル・されていないファイルがある
$ git status
On branch master
Your branch is ahead of 'origin/master' by 3 commits.
  (use "git push" to publish your local commits)
Changes to be committed:
  (use "git reset HEAD <file>..." to unstage)

    modified:   hoge1.txt

Changes not staged for commit:
  (use "git add <file>..." to update what will be committed)
  (use "git checkout -- <file>..." to discard changes in working directory)

    modified:   hoge1.txt

# 両方の差分を見る
$ git diff HEAD
diff --git a/hoge1.txt b/hoge1.txt
index 84ec994..1e3893b 100644
--- a/hoge1.txt
+++ b/hoge1.txt
@@ -1,4 +1,3 @@
 hoge
 hoge
 piyo
-foo
diff --git a/hoge2.txt b/hoge2.txt
index e42f4ce..1a57997 100644
--- a/hoge2.txt
+++ b/hoge2.txt
@@ -1,2 +1,3 @@
 hoge
 fuga
+piyo
ブランチHEAD間の差分を表示
git diff [branch1] [branch1]
指定した二つのブランチbranch1``branch2の、同じファイルパスに存在するファイル同士全てを比較します。
ファイルの状態はブランチのHEAD時点のものです。
branch1からbranch2に至るまで、どのファイルのどの行が増えたか(消えたか)が表示されます。
# 二ブランチ間の比較
$ git diff branch1 branch2
diff --git a/hoge1.txt b/hoge1.txt
index 0ef7e93..1e3893b 100644
--- a/hoge1.txt
+++ b/hoge1.txt
@@ -1 +1,3 @@
+hoge
+hoge
 piyo
diff --git a/hoge2.txt b/hoge2.txt
new file mode 100644
index 0000000..9128c3e
--- /dev/null
+++ b/hoge2.txt
@@ -0,0 +1 @@
+fuga
diff --git a/hoge3.txt b/hoge3.txt
new file mode 100644
index 0000000..0ef7e93
--- /dev/null
+++ b/hoge3.txt
@@ -0,0 +1 @@
+piyo
別ブランチの別ファイル同士の差分を表示
git diff [branch1]:[file1] [branch2]:[file2]
ブランチbranch1中のfile1と、ブランチbranch2中のfile2を比較します。
これも、ファイルの状態はブランチのHEAD時点のものとなります。
$ git diff branch1:hoge1.txt branch2:hoge1.txt
diff --git a/branch1:hoge1.txt b/branch2:hoge1.txt
index 0ef7e93..1e3893b 100644
--- a/branch1:hoge1.txt
+++ b/branch2:hoge1.txt
@@ -1 +1,3 @@
+hoge
+hoge
 piyo
二つのコミット履歴間の差分を表示
git diff [commit1] [commit2]
二コミット間の差分を表示します。
commit1``commit2はコミットのSHAで指定可能ですが、HEADとかHEAD~とかHEAD^も指定できます。
# ブランチのHEADと、その一つ前のコミット時点との差分を表示
$ git diff HEAD~ HEAD
diff --git a/hoge2.txt b/hoge2.txt
new file mode 100644
index 0000000..2262de0
--- /dev/null
+++ b/hoge2.txt
@@ -0,0 +1 @@
+hoge

# SHAで指定
$ git diff ebc2e989bc3eab80ae3e34790c01c591de4f2287 2969a1d4dc0face926b0d50343a9d506f71924f7
diff --git a/hoge2.txt b/hoge2.txt
deleted file mode 100644
index 2262de0..0000000
--- a/hoge2.txt
+++ /dev/null
@@ -1 +0,0 @@
-hoge
差分が存在するファイル名だけ表示
git diff --name-only
名前だけ表示。差分が存在するかどうかチェックするのに便利です。
# ファイル名表示
$ git diff --name-only
hoge1.txt

# 他のdiffパターンにも付加できる
$ git diff HEAD~ HEAD
hoge2.txt
ローカルブランチとリモートブランチの差分を比較
git diff [remote][local]
ローカルとリモートの差分を見たい人用。
pull/pushするときなどに。
$ git diff master origin/master
diff --git a/hoge1.txt b/hoge1.txt
index 1e3893b..432a4b6 100644
--- a/hoge1.txt
+++ b/hoge1.txt
@@ -1,3 +1,2 @@
 hoge
 hoge
-piyo
diff --git a/hoge2.txt b/hoge2.txt
deleted file mode 100644
index 2262de0..0000000
--- a/hoge2.txt
+++ /dev/null
@@ -1 +0,0 @@
-hoge
差分の統計情報を表示
git diff --stat
変更された行や削除された行の数がファイルごとに表示されます。
# アンステージング状態のファイル
$ git status
On branch master
Your branch is ahead of 'origin/master' by 3 commits.
  (use "git push" to publish your local commits)
Changes not staged for commit:
  (use "git add <file>..." to update what will be committed)
  (use "git checkout -- <file>..." to discard changes in working directory)

    modified:   hoge1.txt
    modified:   hoge2.txt

no changes added to commit (use "git add" and/or "git commit -a")

# どのファイルに、何行の修正・削除があったか
$ git diff --stat

 hoge1.txt | 1 -
 hoge2.txt | 1 +
 2 files changed, 1 insertion(+), 1 deletion(-)
【git】git pushのデフォルト動作を追う
git push
前回の記事では、引数やオプションのないgit pushの挙動を確認しました。
今回はgit pushに何も指定しない場合、どのような動作になるのかを検証しました。
git pushの挙動
試しにmasterブランチ上でファイルhoge1.txtに変更を加え、リモートリポジトリにgit pushします。
# ブランチの構成
$ git branch
  branch1
  branch2
* master

# ファイルの構成
$ ls
LICENSE    README.md  hoge1.txt

# hoge1.txtに変更を加える
$ echo "hoge" >> hoge1.txt

# hoge1.txtがブランチのheadから変更された
$ git status
On branch master
Your branch is up-to-date with 'origin/master'.
Changes not staged for commit:
  (use "git add <file>..." to update what will be committed)
  (use "git checkout -- <file>..." to discard changes in working directory)

    modified:   hoge1.txt

no changes added to commit (use "git add" and/or "git commit -a")

# 変更をステージング&コミット
$ git commit -a -m "modify hoge1.txt"
[master 6c13eb5] modify hoge1.txt
 1 file changed, 1 insertion(+)

# 怒られるけど、なんだかんだpushは許してくれる
$ git push
warning: push.default is unset; its implicit value has changed in
Git 2.0 from 'matching' to 'simple'. To squelch this message
and maintain the traditional behavior, use:

  git config --global push.default matching

To squelch this message and adopt the new behavior now, use:

  git config --global push.default simple

When push.default is set to 'matching', git will push local branches
to the remote branches that already exist with the same name.

Since Git 2.0, Git defaults to the more conservative 'simple'
behavior, which only pushes the current branch to the corresponding
remote branch that 'git pull' uses to update the current branch.

See 'git help config' and search for 'push.default' for further information.
(the 'simple' mode was introduced in Git 1.7.11. Use the similar mode
'current' instead of 'simple' if you sometimes use older versions of Git)

Counting objects: 3, done.
Delta compression using up to 4 threads.
Compressing objects: 100% (2/2), done.
Writing objects: 100% (3/3), 259 bytes | 0 bytes/s, done.
Total 3 (delta 1), reused 0 (delta 0)
remote: Resolving deltas: 100% (1/1), completed with 1 local object.
To https://github.com/kanairen/Hoge
   5bf5762..6c13eb5  master -> master
なんだかとてつもなく怒られてるような気がしないでもないですが、
とりあえずpushはできました。
git push時の説明を見てみると、
注意:push.defaultが未設定だよ。
Git2.0だとちゃっかりデフォルト設定が'matching'から'simple'に変わっちゃってるよ。
このうざいメッセージを表示させないようにするには、デフォルト設定を

git config --global push.default matching

で変えてね。

新しいデフォルト設定にあわせるなら

  git config --global push.default simple

してね。

push.defaultを'matching'に変えると、gitはローカルにある全ブランチを同じ名前のリモートブランチにpushしちゃうよ。

Git2.0からデフォルトになったもっと安全な'simple'は、デフォルトの`git pull`を使った更新のように、
現在のローカルブランチにアップストリームとして設定されている同名のブランチにのみpushするよ。

push.defaultについてもっと知りたかったら、`git help config`を見てpush.defaultを探してみてね。
('simple'モードはGit1.7.11から公開されたんだ。もし古いGitを使ってたら、似たモードの'current'を代わりに使ってね)
(アップストリームについてはこちら)
この説明から、
git pushのデフォルト操作はgit push.defaultの設定で決まるgit push.defaultの設定は複数存在する
ことがわかりました。
git push.defaultの種類
push.defaultについてもっと知りたかったら、
git help configを見てpush.defaultを探してみてね。
言われたとおりに探してみました。
$ git help config

# ----ここから lessコマンド のようにスクロールするヘルプ出現----

GIT-CONFIG(1)                                    Git Manual                                   GIT-CONFIG(1)

NAME
       git-config - Get and set repository or global options

# ...
# さまざまなhelp項目
# ...

push.default
           Defines the action git push should take if no refspec is explicitly given. Different values are
           well-suited for specific workflows; for instance, in a purely central workflow (i.e. the fetch
           source is equal to the push destination), upstream is probably what you want. Possible values
           are:

           o   nothing - do not push anything (error out) unless a refspec is explicitly given. This is
               primarily meant for people who want to avoid mistakes by always being explicit.

           o   current - push the current branch to update a branch with the same name on the receiving
               end. Works in both central and non-central workflows.

           o   upstream - push the current branch back to the branch whose changes are usually integrated
               into the current branch (which is called @{upstream}). This mode only makes sense if you are
               pushing to the same repository you would normally pull from (i.e. central workflow).

           o   simple - in centralized workflow, work like upstream with an added safety to refuse to push
               if the upstream branch's name is different from the local one.

               When pushing to a remote that is different from the remote you normally pull from, work as
               current. This is the safest option and is suited for beginners.

               This mode has become the default in Git 2.0.

           o   matching - push all branches having the same name on both ends. This makes the repository
               you are pushing to remember the set of branches that will be pushed out (e.g. if you always
               push maint and master there and no other branches, the repository you push to will have
               these two branches, and your local maint and master will be pushed there).

               To use this mode effectively, you have to make sure all the branches you would push out are
               ready to be pushed out before running git push, as the whole point of this mode is to allow
               you to push all of the branches in one go. If you usually finish work on only one branch and
               push out the result, while other branches are unfinished, this mode is not for you. Also
               this mode is not suitable for pushing into a shared central repository, as other people may
               add new branches there, or update the tip of existing branches outside your control.

               This used to be the default, but not since Git 2.0 (simple is the new default).
ありました。が、全文訳す気力はないのでかいつまんでまとめます。
nothing
明示的なブランチ名の指定がなければgit pushが実行されない。
すなわち、デフォルトgit pushが使えなくなります。
current
現在いるローカルブランチと同名のリモートブランチへpushする。
upstream
現在いるローカルブランチに指定されているアップストリームへpushする。
simple
current + upstream。現在いるローカルブランチと同名、かつアップストリームとして指定されているリモートブランチへpushする。
matching
ローカルにある各ブランチを同名のリモートブランチにpushする。
git push.default のデフォルト値
すでに上の警告文内にも出ていましたが、
- Git2.0以前であれば、
git push.defaultはmatching - Git2.0以降であれば、
git push.defaultはsimple
だったんですね。
ちなみに自分が使っていたGitのバージョンは2.7.4でした。
デフォルトのgit pushを確かめてみたところ、確かに現在いるローカルブランチしかpushされないsimpleでした。
$ git --version
git version 2.7.4 (Apple Git-66)
hub version 2.2.3

# masterで変更(出力省略)
$ echo "piyo" >> hoge1.txt
$ git commit -a -m "modify hoge1.txt"

# branch1で変更(出力省略)
$ git checkout branch1
$ echo "piyo" >> hoge1.txt
$ git commit -a -m "modify hoge1.txt"

# branch2で変更(出力省略)
$ git checkout branch2
$ echo "piyo" >> hoge1.txt
$ git commit -a -m "modify hoge1.txt"

$ git push
warning: push.default is unset; its implicit value has changed in
...
#
# 警告文省略
#

Counting objects: 3, done.
Delta compression using up to 4 threads.
Compressing objects: 100% (2/2), done.
Writing objects: 100% (3/3), 268 bytes | 0 bytes/s, done.
Total 3 (delta 1), reused 0 (delta 0)
remote: Resolving deltas: 100% (1/1), completed with 1 local object.
To https://github.com/kanairen/Hoge
   f5a2b8c..6add3e3  branch2 -> branch2
【git】git pullのデフォルト動作を追う
git pull
~git pull`リモートリポジトリ上ブランチの状態をローカルブランチに反映させる際、
自分はよく明示的にpullしたいブランチ名を指定しています。
例えばmasterブランチをpullするときは
$ git push origin master
のようにしています。
これはリモートのmasterブランチの状態をローカルブランチに反映させるコマンド
(厳密にはリモートのmasterブランチをfetch+ローカルブランチにmergeしている)ですが
このコマンド、実際には
# git push <ローカルのブランチ名>:<リモートのブランチ名>
$ git push origin master:master
の省略形になります。 ローカルブランチmasterの名称が省略され、リモートブランチorigin masterにマッチする ブランチを探してpullしていたようです。
同様に、引数を指定しないgit pullでも、リモートブランチにマッチする
ローカルブランチに変更が反映されます。
# 3つのブランチがある状態
$ git branch
  branch1
  branch2
* master

# masterブランチにだけリモートとローカルで紐付いたブランチがある
$ git pull
remote: Counting objects: 9, done.
remote: Compressing objects: 100% (5/5), done.
remote: Total 9 (delta 2), reused 8 (delta 1), pack-reused 0
Unpacking objects: 100% (9/9), done.
From https://github.com/hogehoge/Hoge
   f9db208..5bf5762  master     -> origin/master
 * [new branch]      branch1    -> origin/branch1
 * [new branch]      branch2    -> origin/branch2
Updating f9db208..5bf5762
Fast-forward
 hoge1.txt | 1 +
 1 file changed, 1 insertion(+)
 create mode 100644 hoge1.txt
このリモートブランチとローカルブランチは、どのような規則で紐付いているのでしょうか。
リモートブランチとローカルブランチの紐付け
上記の紐付けは、git branch -vvで確認することができます。
$ git branch -vv
  branch1 f9db208 Initial commit
  branch2 f9db208 Initial commit
* master  5bf5762 [origin/master] add hoge1.txt .
上の例では、リモートのmasterブランチがローカルのorigin/masterブランチに紐付いていることを示しています。
あるローカルブランチ上で引数なしgit pullを行った時、fetch&mergeされるのはここに記述されたリモートブランチになるということがわかりました。
一方で、branch1とbranch2には紐付いているローカルブランチはなく、例えばbranch2上でgit pullすると怒られてしまいます。
# 激おこ
$ git pull
There is no tracking information for the current branch.
Please specify which branch you want to merge with.
See git-pull(1) for details.

    git pull <remote> <branch>

If you wish to set tracking information for this branch you can do so with:

    git branch --set-upstream-to=origin/<branch> branch2
警告を読んでいくと、どうやらgit branch --set-upstream-to=origin/<branch> branch2でbranch2に紐づくリモートブランチを設定できるようです。
やってみます。
# ローカルのorigin/branch2をリモートのbranch2に紐付け
$ git branch --set-upstream-to=origin/branch2 branch2
Branch branch2 set up to track remote branch branch2 from origin.

# git branch -vv の結果が更新されている
$ git branch -vv
  branch1 f9db208 Initial commit
* branch2 cc369d6 [origin/branch2] add hoge3.txt .
  master  5bf5762 [origin/master] add hoge1.txt .

# できた!
$ git pull
Updating f9db208..cc369d6
Fast-forward
 hoge1.txt | 1 +
 hoge2.txt | 1 +
 hoge3.txt | 1 +
 3 files changed, 3 insertions(+)
 create mode 100644 hoge1.txt
 create mode 100644 hoge2.txt
 create mode 100644 hoge3.txt
無事pullできました。
因みに、紐付けられたブランチの組のうち
- リモートブランチをアップストリームとよび、
- ローカルブランチをトラッキングブランチと呼ぶ
そうです。
先程の--set-upstream-toは、アップストリームに対応するトラッキングブランチを設定するということだったんですね。
デフォルトの--set-upstream-to
先程はorigin/branch2のアップストリームを設定しましたが、普段から引数なしのgit pullを使っている皆さんであれば「あれ?設定した記憶がない。。。」と思うかもしれません。
調べてみたところ、以下のパターンに関してはデフォルトのアップストリームが設定済みの状態になっているそうです。
git cloneしたとき- リモートのブランチから新しくブランチを作成した場合
このため、普段からリポジトリをcloneしている人はあまり気にせずに引数なしでgit pullできるのかもしれません。
【Docker】Dockerで簡単にpython開発環境を構築する
前回に引き続き、Dockerを使ってpython開発環境を構築してみました。
(といっても簡単なインタラクティブシェルですが)
DockerHubのイメージをpull
DockerHubがpython入りのイメージを配布していたので、これを使ってみようと思いました。
docker pullでイメージをpullし、ローカルに追加します。
$ docker pull python
Using default tag: latest
latest: Pulling from library/python
4176fe04cefe: Pull complete
851356ecf618: Pull complete
6115379c7b49: Pull complete
aaf7d781d601: Pull complete
40cf661a3cc4: Pull complete
975fe2fd635f: Pull complete
bf4db784e7fd: Pull complete
0491f7e9426b: Pull complete
Digest: sha256:bf0718e2882cabc144c9c07d758b09c65efc104a6ddc72a9a976f8b26f67c2ee
Status: Downloaded newer image for python:latest
全てPull completeになったらpull完了。
docker imagesで確認します。
REPOSITORY          TAG                 IMAGE ID            CREATED             SIZE
<none>              <none>              e13980182719        2 days ago          224MB
python              latest              336d482502ab        9 days ago          692MB
ubuntu              14.04               dc4491992653        4 weeks ago         222MB
二行目に確認できました。
コンテナを生成
次に、pullしたイメージからコンテナを生成します。
生成方法は前回投稿したDockerの記事同様docker run。
# コンテナ生成
$ docker run -t python

$ docker run -t python
Python 3.6.4 (default, Feb 17 2018, 09:32:33)
[GCC 4.9.2] on linux
Type "help", "copyright", "credits" or "license" for more information.
>>>
【git】コンフリクトを片方だけ残す
メモ。 gitでコンフリクトした際、以下のコマンドでマージ元、マージ先どちらかの変更のみを適用できる。
被マージブランチに合わせる
$ git checkout --ours .
マージブランチに合わせる
$ git checkout --theirs .
DockerをMacで動かしてみる
Dockerとは
Dockerはコンテナ型の仮想化ツールです。
仮想化ツールといえば、VMWareやVirtualboxなどの仮想化ソフトウェアを思い浮かべるかもしれませんが、
これらはOSごと環境を提供するハイパーバイザ型の仮想化技術と呼ばれます。
それに対し、コンテナ型の仮想化ツールではコンテナと呼ばれる小さな仮想化環境が作成され、それらが同じホストOSを共有します。 その上でサーバミドルウェアやライブラリ、ドライバなどが導入された環境をコンテナ内で提供できるので、よりコンパクトな仮想化が可能です。 また各コンテナは独立して動作するため、いらなくなった仮想環境はすぐに使い捨てることができます。
そのため、特定のアプリケーションを実行するような環境を容易に共有することができ、環境構築の煩わしさを軽減することができます。
DockerイメージとDockerHub
Dockerイメージとは、Dockerコンテナを作成する元となるものです。
オブジェクト指向でいうと、DockerイメージがクラスでDockerコンテナがインスタンスのようなものでしょうか。
DockerではGitのようにリモートリポジトリを作成してイメージを共有することができます。
GithubのようなリモートリポジトリサービスにDockerHubがあるので、そこにイメージをpushして公開することができます。
Docker for Macをインストールする
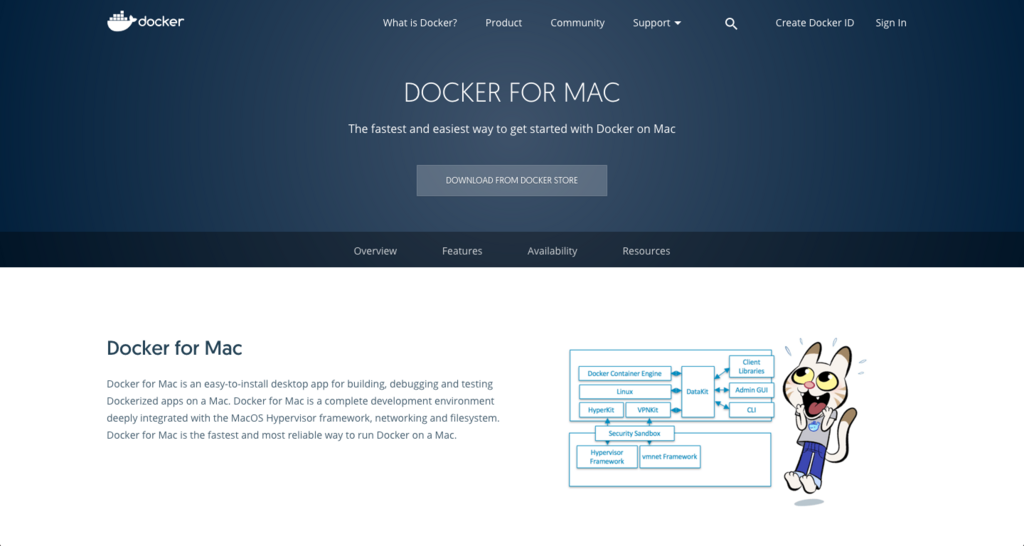
Docker for macにアクセスし、" DOWNLOAD FROM DOCKER STORE"をクリック。
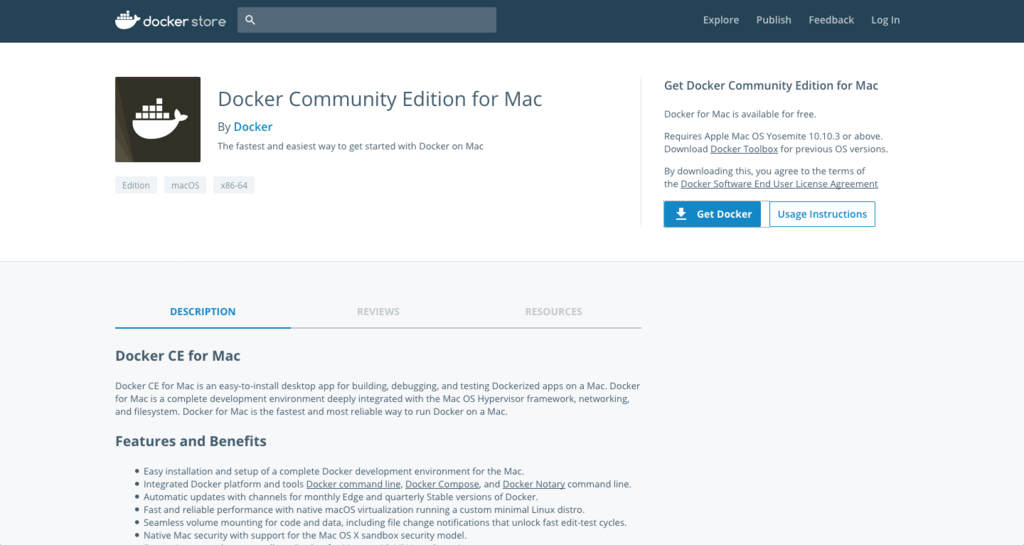
"Get Docker"をクリック。
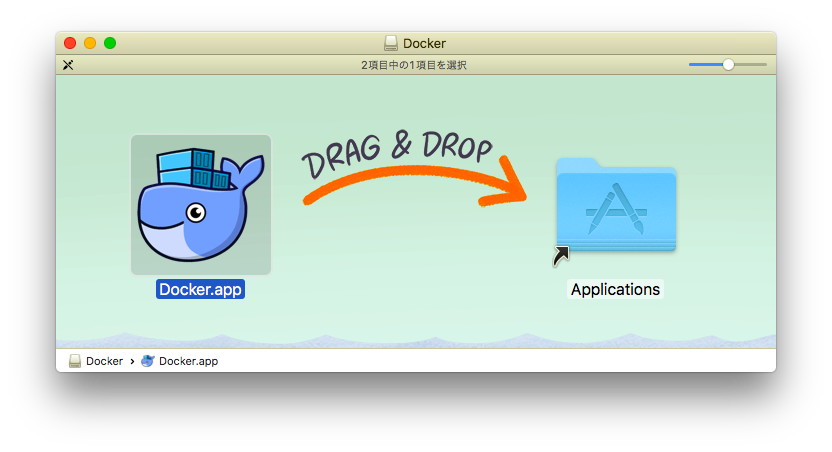
dmgファイルがダウンロードできるので、ダウンロードが完了したらdmgファイルをクリック。
くじらアイコンをApplicationに移動。
lancherなりSpotlightなりでアプリケーションを実行。

するとWelcomeメッセージが表示されます。
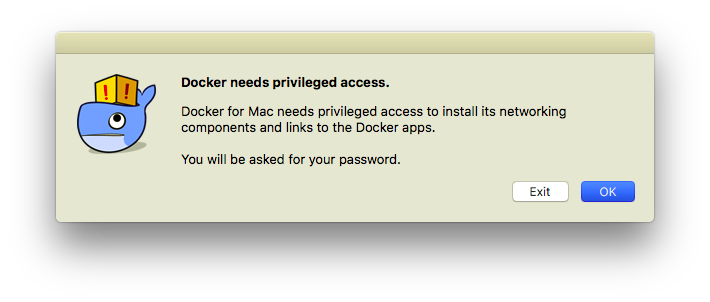
ダイアログのNextを押していき、Dockerアプリのprivate accessのためアカウントパスワードを入力。

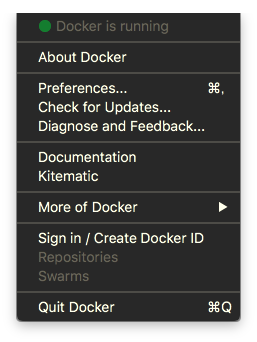
メニューバーにアイコンが出現し、メニューの一番上に" Docker is runnning" と表示されればOK。

Dockerイメージを作成する
Dockerイメージをpull
DockerHub上にアップロードされているDockerイメージからコンテナを作成してみます。
docker pullコマンドで、DockerHubからイメージをGitのようにpullすることができます。
# Dockerイメージをpull
$ docker pull docker/whalesay

# Dockerイメージ一覧
$ docker images
REPOSITORY          TAG                 IMAGE ID            CREATED             SIZE
docker/whalesay     latest              6b362a9f73eb        2 years ago         247MB
pullしたイメージはDocker公式が予め用意しているHelloWorld的なイメージです。
Dockerコンテナを作成する
用意したDockerイメージからDockerコンテナを作成します。
docker runコマンドで作成可能です。
$ docker run docker/whalesay cowsay boo

 _____
< boo >
 -----
    \
     \
      \
                    ##        .
              ## ## ##       ==
           ## ## ## ##      ===
       /""""""""""""""""___/ ===
  ~~~ {~~ ~~~~ ~~~ ~~~~ ~~ ~ /  ===- ~~~
       \______ o          __/
        \    \        __/
          \____\______/
コンテナの実行成功です。クジラのAAが出現し、booと鳴きます。
docker/whalesayは先程pull取得したDockerイメージのリポジトリ名です。
ここで使用するコンテナではcowsay というコマンドとbooという文字列を引数に取っています。
ちなみに-dオプションを付加すると、コンテナがバックグラウンドで実行されます。
$ docker run -d docker/whalesay cowsay boo
b6ca90c1108dbb037b5213cd9ed5537060992903b3e805e0fba46881f4c4babc
実行中のコンテナは、docker psで起動することができます。
下の例では実行しているコンテナがないため、何も表示していません。
$ docker ps
CONTAINER ID        IMAGE               COMMAND             CREATED             STATUS              PORTS               NAMES
docker ps -aで、いままでに実行したコンテナを含めて表示できます。
$ docker ps -a
CONTAINER ID        IMAGE               COMMAND             CREATED              STATUS                          PORTS               NAMES
b6ca90c1108d        docker/whalesay     "cowsay boo"        15 seconds ago       Exited (0) 14 seconds ago                           compassionate_khorana
ae604513529a        docker/whalesay     "cowsay bar"        About a minute ago   Exited (0) About a minute ago                       romantic_brattain
f2ddfcbcd9b5        docker/whalesay     "cowsay boo"        About a minute ago   Exited (0) About a minute ago                       naughty_nobel
まとめ
いかがだったでしょうか。Dockerを使えば、
などの環境を構築済みの状態で簡単に共有できます。 アプリケーションのハンズオンや新しいライブラリを試したいときに、一度使ってみてはいかがでしょうか。