`/etc/zshrc` は末尾でターミナル別拡張スクリプトを呼び出せる
/etc/zshrc を調べた時のメモ。
TL;DR
/etc/zshrcは末尾でterminal別拡張zshrcを呼ぶ- macはデフォルトで
/etc/zshrc_Apple_Terminalを用意しているので、それが呼び出される
/etc/zshrc の拡張スクリプト呼び出し
/etc/zshrc は末尾でターミナル別の拡張スクリプト /etc/zshrc_$TERM_PROGRAM を呼び出すようになっており、ターミナルごとに独自の拡張をいれることが可能になっています。
環境変数 $TERM_PROGRAM にはターミナル固有の値が含まれ、例えばMacのターミナルであれば $TERM_PROGRAM の値が Apple_Terminal となっています。
$ cat zshrc | tail -n 10
[[ -n ${key[Home]} ]] && bindkey "${key[Home]}" beginning-of-line
[[ -n ${key[End]} ]] && bindkey "${key[End]}" end-of-line
[[ -n ${key[Up]} ]] && bindkey "${key[Up]}" up-line-or-search
[[ -n ${key[Down]} ]] && bindkey "${key[Down]}" down-line-or-search

# Default prompt
PS1="%n@%m %1~ %# "

# Useful support for interacting with Terminal.app or other terminal programs
[ -r "/etc/zshrc_$TERM_PROGRAM" ] && . "/etc/zshrc_$TERM_PROGRAM" # ここで拡張スクリプトが実行される
Macターミナルでの拡張スクリプト
Macターミナルでは /etc/zshrc_Apple_Terminal が用意されており、これが /etc/zshrc 末尾で呼び出されます。
# Zsh support for Terminal.


# Working Directory
#
# Tell the terminal about the current working directory at each prompt.
#
# Terminal uses this to display the directory in the window title bar
# and tab bar, and for behaviors including creating a new terminal with
# the same working directory and restoring the working directory when
# restoring a terminal for Resume. See Terminal > Preferences for
# additional information.

if [ -z "$INSIDE_EMACS" ]; then

    update_terminal_cwd() {
    # Identify the directory using a "file:" scheme URL, including
    # the host name to disambiguate local vs. remote paths.

    # Percent-encode the pathname.
    local url_path=''
    {
        # Use LC_CTYPE=C to process text byte-by-byte and
        # LC_COLLATE=C to compare byte-for-byte. Ensure that
        # LC_ALL and LANG are not set so they don't interfere.
        local i ch hexch LC_CTYPE=C LC_COLLATE=C LC_ALL= LANG=
        for ((i = 1; i <= ${#PWD}; ++i)); do
        ch="$PWD[i]"
        if [[ "$ch" =~ [/._~A-Za-z0-9-] ]]; then
            url_path+="$ch"
        else
            printf -v hexch "%02X" "'$ch"
            url_path+="%$hexch"
        fi
        done
    }

    printf '\e]7;%s\a' "file://$HOST$url_path"
    }

    # Register the function so it is called at each prompt.
    autoload -Uz add-zsh-hook
    add-zsh-hook precmd update_terminal_cwd
fi


# Resume Support: Save/Restore Shell State
#
# Terminal assigns each terminal session a unique identifier and
# communicates it via the TERM_SESSION_ID environment variable so that
# programs running in a terminal can save/restore application-specific
# state when quitting and restarting Terminal with Resume enabled.
#
# The following code defines a shell save/restore mechanism. Users can
# add custom state by defining a `shell_session_save_user_state` function
# or an array of functions `shell_session_save_user_state_functions` that
# write restoration commands to the session state file at exit. The first
# argument of the function is the pathname of the session state file in
# which to store state. e.g., to save a variable:
#
#   shell_session_save_user_state() { echo MY_VAR="'$MY_VAR'" >> "$1"; }
#
# or:
#
#   save_my_var() { echo MY_VAR="'$MY_VAR'" >> "$1"; }
#   shell_session_save_user_state_functions+=(save_my_var)
#
# During shell startup the session file is executed and then deleted.
# You may save/restore arbitrarily complex/large state by writing it
# to some other file(s) and writing command(s) to the state file that
# restore that data. You should typically use the TERM_SESSION_ID
# as part of your file or directory names.
#
# The default behavior arranges to save and restore the shell command
# history independently for each restored terminal session. It also
# merges commands into the global history for new sessions. Because of
# this it is recommended that you set HISTSIZE and SAVEHIST to larger
# values.
#
# You may disable this behavior and share a single history by setting
# SHELL_SESSION_HISTORY to 0. The shell options INC_APPEND_HISTORY,
# INC_APPEND_HISTORY_TIME and SHARE_HISTORY are used to share new
# commands among running shells; therefore, if any of these is enabled,
# per-session history is disabled by default. You may explicitly enable
# it by setting SHELL_SESSION_HISTORY to 1.
#
# Note that this uses the precmd hook to enable per-session history the
# first time for each new session; if that doesn't run, the per-session
# history won't take effect until the first restore.
#
# The save/restore mechanism as a whole can be disabled by setting an
# environment variable (typically in `${ZDOTDIR:-$HOME}/.zshenv`):
#
#   SHELL_SESSIONS_DISABLE=1

if [ ${SHELL_SESSION_DID_INIT:-0} -eq 0 ] && [ -n "$TERM_SESSION_ID" ] && [ ${SHELL_SESSIONS_DISABLE:-0} -eq 0 ]; then

    # Do not perform this setup more than once.
    SHELL_SESSION_DID_INIT=1

    # Set up the session directory/file.
    SHELL_SESSION_DIR="${ZDOTDIR:-$HOME}/.zsh_sessions"
    SHELL_SESSION_FILE="$SHELL_SESSION_DIR/$TERM_SESSION_ID.session"
    mkdir -m 700 -p "$SHELL_SESSION_DIR"

    #
    # Restore previous session state.
    #

    if [ -r "$SHELL_SESSION_FILE" ]; then
 . "$SHELL_SESSION_FILE"
    /bin/rm "$SHELL_SESSION_FILE"
    fi

    #
    # Note: Use absolute paths to invoke commands in the exit code and
    # anything else that runs after user startup files, because the
    # search path may have been modified.
    #

    #
    # Arrange for per-session shell command history.
    #

    shell_session_history_allowed() {
    # Return whether per-session history should be enabled.
    if [ -n "$HISTFILE" ]; then
        # If this defaults to off, leave it unset so that we can
        # check again later. If it defaults to on, make it stick.
        local allowed=0
        if [[ -o INC_APPEND_HISTORY ]] || [[ -o INC_APPEND_HISTORY_TIME ]] || [[ -o SHARE_HISTORY ]]; then
        allowed=${SHELL_SESSION_HISTORY:-0}
        else
        allowed=${SHELL_SESSION_HISTORY:=1}
        fi
        if [ $allowed -eq 1 ]; then
        return 0
        fi
    fi
    return 1
    }

    if [ ${SHELL_SESSION_HISTORY:-1} -eq 1 ]; then
    SHELL_SESSION_HISTFILE="$SHELL_SESSION_DIR/$TERM_SESSION_ID.history"
    SHELL_SESSION_HISTFILE_NEW="$SHELL_SESSION_DIR/$TERM_SESSION_ID.historynew"
    SHELL_SESSION_HISTFILE_SHARED="$HISTFILE"

    shell_session_history_enable() {
        (umask 077; /usr/bin/touch "$SHELL_SESSION_HISTFILE_NEW")
        HISTFILE="$SHELL_SESSION_HISTFILE_NEW"
        SHELL_SESSION_HISTORY=1
    }

    # If the session history already exists and isn't empty, start
    # using it now; otherwise, we'll use the shared history until
    # we've determined whether users have enabled/disabled this.
    if [ -s "$SHELL_SESSION_HISTFILE" ]; then
        fc -R "$SHELL_SESSION_HISTFILE"
        shell_session_history_enable
    else
        # At the first prompt, check whether per-session history should
        # be enabled. Delaying until after user scripts have run allows
        # users to opt in or out. If this doesn't get executed (probably
        # because a user script inadvertently removed the hook), we'll
        # check at shell exit; that works, but doesn't start the per-
        # session history until the first restore.

        shell_session_history_check() {
        if [ ${SHELL_SESSION_DID_HISTORY_CHECK:-0} -eq 0 ]; then
            SHELL_SESSION_DID_HISTORY_CHECK=1
            shell_session_history_allowed && shell_session_history_enable
            # Uninstall this check.
            autoload -Uz add-zsh-hook
            add-zsh-hook -d precmd shell_session_history_check
        fi
        }
        autoload -Uz add-zsh-hook
        add-zsh-hook precmd shell_session_history_check
    fi

    shell_session_save_history() {
        shell_session_history_enable

        # Save new history to an intermediate file so we can copy it.
        fc -AI

        # If the session history doesn't exist yet, copy the shared history.
        if [ -f "$SHELL_SESSION_HISTFILE_SHARED" ] && [ ! -s "$SHELL_SESSION_HISTFILE" ]; then
        echo -ne '\n...copying shared history...' >&2
        (umask 077; /bin/cp "$SHELL_SESSION_HISTFILE_SHARED" "$SHELL_SESSION_HISTFILE")
        fi

        # Save new history to the per-session and shared files.
        echo -ne '\n...saving history...' >&2
        (umask 077; /bin/cat "$SHELL_SESSION_HISTFILE_NEW" >> "$SHELL_SESSION_HISTFILE_SHARED")
        (umask 077; /bin/cat "$SHELL_SESSION_HISTFILE_NEW" >> "$SHELL_SESSION_HISTFILE")
        /bin/rm "$SHELL_SESSION_HISTFILE_NEW"

        # If there is a history file size limit, apply it to the files.
        if [ -n "$SAVEHIST" ]; then
        echo -n 'truncating history files...' >&2
        fc -p "$SHELL_SESSION_HISTFILE_SHARED" && fc -P
        fc -p "$SHELL_SESSION_HISTFILE" && fc -P
        fi
        echo -ne '\n...' >&2
    }
    fi

    #
    # Arrange to save session state when exiting the shell.
    #

    shell_session_save() {
    # Save the current state.
    if [ -n "$SHELL_SESSION_FILE" ]; then
        echo -ne '\nSaving session...' >&2
        (umask 077; echo 'echo Restored session: "$(/bin/date -r '$(/bin/date +%s)')"' >| "$SHELL_SESSION_FILE")

        # Call user-supplied hook functions to let them save state.
        whence shell_session_save_user_state >/dev/null && shell_session_save_user_state "$SHELL_SESSION_FILE"
        local f
        for f in $shell_session_save_user_state_functions; do
        $f "$SHELL_SESSION_FILE"
        done

        shell_session_history_allowed && shell_session_save_history
        echo 'completed.' >&2
    fi
    }

    # Delete old session files. (Not more than once a day.)
    SHELL_SESSION_TIMESTAMP_FILE="$SHELL_SESSION_DIR/_expiration_check_timestamp"
    shell_session_delete_expired() {
    if [ ! -e "$SHELL_SESSION_TIMESTAMP_FILE" ] || [ -z "$(/usr/bin/find "$SHELL_SESSION_TIMESTAMP_FILE" -mtime -1d)" ]; then
        local expiration_lock_file="$SHELL_SESSION_DIR/_expiration_lockfile"
        if /usr/bin/shlock -f "$expiration_lock_file" -p $$; then
        echo -n 'Deleting expired sessions...' >&2
        local delete_count=$(/usr/bin/find "$SHELL_SESSION_DIR" -type f -mtime +2w -print -delete | /usr/bin/wc -l)
        [ "$delete_count" -gt 0 ] && echo $delete_count' completed.' >&2 || echo 'none found.' >&2
        (umask 077; /usr/bin/touch "$SHELL_SESSION_TIMESTAMP_FILE")
        /bin/rm "$expiration_lock_file"
        fi
    fi
    }

    # Update saved session state when exiting.
    shell_session_update() {
    shell_session_save && shell_session_delete_expired
    }
    autoload -Uz add-zsh-hook
    add-zsh-hook zshexit shell_session_update
fi
golang/go issuesの対象傾向を見る
golang/goのissues傾向を調べるため、パッケージなどprefixごとにどのくらいのissueが作られているのかを簡単&ざっくりですが調べてみました。
# Github API(v3) から愚直にpagingしつつissueを取得します
# credentialなしでも叩けますが、rate limitが緩和されるので付与(credentialなしで60/h,ありで5000/h)
$ for i in {1..600}; do curl -XGET "https://api.github.com/repos/golang/go/issues?page=$i&per_page=100&state=all" \
-H "Accept: application/vnd.github.v3+json" \
-H "Authorization: token xxx..." \
| jq ".[].title" >> ~/golang_go_issues_20220619_all.txt; done

$ cat golang_go_issues_20220619_all.txt| wc -l
   52904

# issue template で指定されている `affected/package: title` のタイトルフォーマットを前提にparse(一部従っていないissueもある)・上位20件を表示
$ cat ~/golang_go_issues_20220619_all.txt | sed 's/"//g' | awk -F: '{print $1}' | sort -n | uniq -c | sort -nr | head -n 20
3833 cmd/go
3047 cmd/compile
3000 runtime
2541 proposal
1638 net/http
1500 x/tools/gopls
1076 net
 887 x/pkgsite
 592 cmd/link
 578 x/build
 521 doc
 500 cmd/cgo
 484 os
 470 time
 468 spec
 459 cmd/gc
 427 encoding/json
 419 x/mobile
 414 gccgo
 404 x/website
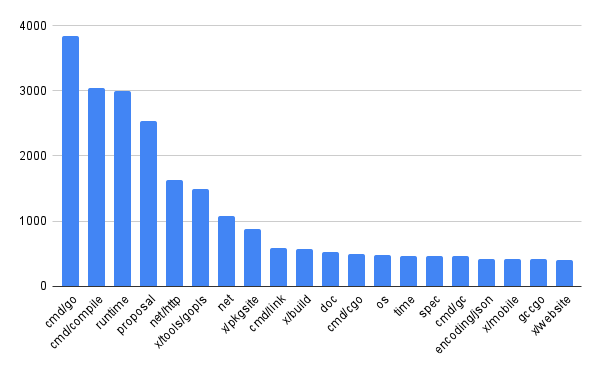
コマンド・処理系関連とproposalが圧倒的に多いですね。
次いでnet/http net が多いのもGoらしく、webを意識した言語らしさを感じます。
(特に net/http だけでも多く、goplsやdocなど周辺ツールよりも多い)
issueが多く作られているパッケージは(バグを多く含んでいたとか、改善点が多いという可能性もありますが)皆が多くの関心を寄せているパッケージという見方もできるので、 Go標準パッケージを読むときの優先順位順位付けなどに使ったりできそうだなと思いました。
Go Conference 2022 Spring で登壇しました
Go Conference 2022 Springで、下記の資料で登壇しました。
Go Conference ってなに?
半年に一度行われるGoのカンファレンスです。
主にGoに関する技術的・組織的な話題についてのトークを聞くことができます。
日本語での登壇が多い印象がありますが、言語に制限はなく英語登壇も可能です。
登壇への経緯
Go Conference Spring 2022では、初めてチャレンジ枠というものが設けられました。 登壇の募集要項には
This is for you to take on new “Go” challenges such as:
- A first the Go presentation.
- Talking about the Go by other language. (ex. Japanese, English, and more)
- Contribution to projects related to the Go.
とあり、
- はじめてGoで登壇する
- 母国語以外で話す
- Go に関連したprojectへの貢献について話す
といった項目が例として挙げられていました。
話は変わりますが、丁度Go Conference Spring 2022の募集が始まった頃に会社の勉強会でOSSライブラリを修正する活動を行っていました。 プロダクトで使用するGo ORMライブラリのバグがプロダクトの開発に影響を与えてしまっていたので、勉強会のネタも兼ねて自社チームメンバーで修正にあたっていました。 自分もその中で修正PRを出しacceptしてもらったので、OSS貢献へのモチベーションが高まっていました。
このような経緯があったので、「初めてのGo登壇」「GoのOSSに貢献する話のネタ」はそろっていました。 さらに「英語で話せば↑3つ揃って役満では???」となり、思い切って上記3つの条件で登壇申請したところ、なんと採用いただくことができました。
登壇内容
登壇では「初めてOSSに貢献する人」にフォーカスした内容としました。
といった点について触れ、自分のOSS貢献経験を交えつつやったことない人もやってみようよというスタンスで発表しました。
特に2. 3. では初めてOSSに貢献する人に「OSS貢献ってこんな感じなんだ」といったイメージを持ってもらい、行動に移すときのハードルを下げてもらうことを目的としました。
また登壇自体の言語を英語としました。 資料はもちろんのこと、話す言語も英語としました。これは自分にとってかなりチャレンジングでした。
登壇直前まで社内の英語話者の方々にレビューを頂き、資料・原稿含めてなんとか発表できる形に持っていくことができました。レビューいただいた方々に感謝、感謝です。。。
登壇では話せなかったこと
今回のGo Conference登壇後では Ask The Speakerという登壇者へのQ&A時間が設けられており、そこで登壇で話せなかったことについて言及させていただくことができました。 その中では「初めてのOSSについての記事増えてきて、OSS貢献を意識するきっかけが増えた」ということについて話しました。
このようなOSSに関する記事では具体的な自分の貢献体験やその時の気持ちなどについて率直にかかれていることが多く、OSS貢献への具体的なイメージを持ちやすいのではと思い自分の発表でも言及する予定でした。が、結局発表のサイズ的に収まらないかもなと思い省略してしまいました。
また下記のような、貢献するにあたって注意したほうがよい点に言及しようかなと思ったのですが、貢献自体を萎縮させてしまうかもと思い取りやめました。 (ただOSS組織の過剰な負荷にならないような貢献を考えるのも、一つの貢献活動だとは思っています)
反省点
初めて貢献する人を応援するという内容の一方で、自分の境遇としては経験者のレビューを頂いていたので「そうはいっても知り合いの経験者なんていないよ...」といった印象を聞き手に与えてしまったのでは?という点は気になっていました。いわゆるOSS貢献活動に対するメンター的存在がいると、貢献自体だけでなく、プロセスなども含めて色々聞けるのでOSS活動はかなり捗ります。ただスライド内でも言及していますが、そういった方を見つけるのはなかなか難しい面もあるので「自分に初めてのOSS貢献のきっかけがあり、かつメンターがいなかったとして、どうしたら貢献の一歩を踏み出せたか」といったところはもう少し掘り下げても良かったかもしれません。
また発表自体の構成や話し方・スライドのデザインなど登壇で重要なポイントをあまり詰めきれてなかったり、その結果として無味乾燥な発表になってしまっているかも?という点も気になりました。 聞き手はせっかく時間を割いて聞いてくれるので、登壇するなら意義のある内容でありつつも、楽しい発表ができるようになりたいです。
おわりに
今月はGo Conference以外にもイベントがたくさんあったのでかなりタフな月となりました。 今後はスケジュールが過密にならないよう気をつけつつ、忙しい状況でも気持ちに余裕を持てるようになりたいです。
おそらく次のGo Conferenceも暫くしたら募集が始まると思うので、次回はより技術的な発表内容で応募してみたいなと思いました。 そのためにも今からネタ探しをしておきます。やっていくぞ
参考
【Go】pprofを使用したプロファイリングと可視化
Goの pprof を使うにあたり、調べた内容をメモしました。
Goプロファイリング手順
Goのプロファイリングは大きく以下の2工程に分けられます。
- 計測(pprofバイナリを作成)
- 出力(pprofバイナリを可視化)
1. 計測
Goバイナリを実行したときのCPU・メモリ等に対するプロファイリング結果を取得します。
◆ runtime/pprof で計測する
runtime/pprof パッケージをコード側で参照して計測します。
例えばCPUのプロファイル結果取得には runtime.StartCPUProfile が、(ヒープ)メモリのプロファイル結果取得には runtime.WriteHeapProfile が使用できます。
example
package main

import (
    "fmt"
    "os"
    "runtime"
    "runtime/pprof"
    "time"
)

func main() {
    fc, err := profileCPU()
    if err != nil {
        panic(err)
    }
    defer fc()

    fm, err := profileHeap()
    if err != nil {
        panic(err)
    }
    defer fm()

    process(10)
}

func profileCPU() (func(), error) {
    f, err := os.Create("cpu.pprof")
    if err != nil {
        return nil, err
    }

    if err := pprof.StartCPUProfile(f); err != nil {
        return nil, err
    }
    return func() {
        f.Close()
        pprof.StopCPUProfile()
    }, nil
}

func profileHeap() (func(), error) {
    f, err := os.Create("mem.pprof")
    if err != nil {
        return nil, err
    }

    runtime.GC() // reflect latest status
    if err := pprof.WriteHeapProfile(f); err != nil {
        return nil, err
    }
    return func() { f.Close() }, nil
}

func process(sec int) {
    for i := 0; i < sec; i++ {
        time.Sleep(time.Second)
        fmt.Printf("%ds...\n", i+1)
    }
    fmt.Println("finish.")
}
$ go run main.go
$ ls
cpu.pprof  main.go    mem.pprof
◆ net/http/pprof で計測する
_ net/http/pprof パッケージimportを宣言すると、HTTP requestをlistenするサーバーアプリケーションに対してプロファイリングをリクエストすることができます。
endpointは /debug/pprof/ です。
example
package main

import (
    "fmt"
    "log"
    "net/http"
    _ "net/http/pprof"
)

func handler(w http.ResponseWriter, r *http.Request) {
    fmt.Println("hello.")
    w.Write([]byte(`{"message":"hello"}`))
}

func main() {
    http.HandleFunc("/hello", handler)
    log.Println(http.ListenAndServe("localhost:6060", nil))
}
サーバーを立ち上げたあと、 go tools pprof を使用してendpointを指定すると、対象のサーバーのプロファイリングが開始されます。 seconds でプロファイリング時間を指定できます1。指定しなかった場合は30sです。
$ go run main.go

# heap - 10sプロファイリング
go tool pprof "http://localhost:6060/debug/pprof/heap?seconds=10"

# cpu
go tool pprof "http://localhost:6060/debug/pprof/profile"
go tool pprof でプロファイリング終了後はインタラクティブモードになり、その時点までのプロファイル結果を指定したコマンドで出力したりできます。
Fetching profile over HTTP from http://localhost:6060/debug/pprof/profile
Saved profile in /hoge/fuga/pprof/pprof.samples.cpu.003.pb.gz
Type: cpu
Time: Mar 21, 2022 at 3:35pm (JST)
Duration: 30.01s, Total samples = 0
No samples were found with the default sample value type.
Try "sample_index" command to analyze different sample values.
Entering interactive mode (type "help" for commands, "o" for options)
(pprof)
例えば web コマンドでブラウザでプロファイル結果を表示できます。
$ go tool pprof "http://localhost:6060/debug/pprof/profile?seconds=1"
...
(pprof) web

◆ go test -bench のオプションで計測する
xxx_test.go のようなテストプログラムでベンチマークを取る場合、 go test -bench 実行時にpprofバイナリを出力するオプションが使用できます。
cpuprofile
CPUプロファイル結果を出力します。
memprofile
メモリプロファイル結果を出力します。
blockprofile
同期プリミティブ(≒共有リソースへの複数アクセス)で発生したブロッキングを出力します。 www.tokumaru.org
mutexprofile
競合したミューテックスホルダを出力します。
example
$ go test -bench . -cpuprofile cpu.prof -memprofile mem.prof -blockprofile block.prof -mutexprofile mutex.prof
$ ls
bench_test.go  cpu.prof       mem.prof
block.prof     bench.test*     mutex.prof
出力されたバイナリ cpu.prof mem.prof を入力として、後続の出力に使用します。
2. 出力
net/http/pprof のインタラクティブモードのところで紹介してしまいましたが、出力した pprof バイナリは様々な形で可視化できます。
可視化には go tool pprof を使用できます。
go tool pprof -top
$go tool pprof -top mem.pprof
Type: inuse_space
Time: Mar 20, 2022 at 4:45pm (JST)
Showing nodes accounting for 3746.21kB, 100% of 3746.21kB total
      flat  flat%   sum%        cum   cum%
 1537.69kB 41.05% 41.05%  1537.69kB 41.05%  runtime.allocm
 1184.27kB 31.61% 72.66%  1184.27kB 31.61%  runtime/pprof.StartCPUProfile
  512.20kB 13.67% 86.33%   512.20kB 13.67%  runtime.malg
  512.05kB 13.67%   100%  1696.32kB 45.28%  runtime.main
         0     0%   100%  1184.27kB 31.61%  main.main
         0     0%   100%  1184.27kB 31.61%  main.profileCPU
         0     0%   100%   512.56kB 13.68%  runtime.mcall
         0     0%   100%  1025.12kB 27.36%  runtime.mstart
         0     0%   100%  1025.12kB 27.36%  runtime.mstart0
         0     0%   100%  1025.12kB 27.36%  runtime.mstart1
         0     0%   100%  1537.69kB 41.05%  runtime.newm
         0     0%   100%   512.20kB 13.67%  runtime.newproc.func1
         0     0%   100%   512.20kB 13.67%  runtime.newproc1
         0     0%   100%   512.56kB 13.68%  runtime.park_m
         0     0%   100%  1537.69kB 41.05%  runtime.resetspinning
         0     0%   100%  1537.69kB 41.05%  runtime.schedule
         0     0%   100%  1537.69kB 41.05%  runtime.startm
         0     0%   100%   512.20kB 13.67%  runtime.systemstack
         0     0%   100%  1537.69kB 41.05%  runtime.wakep
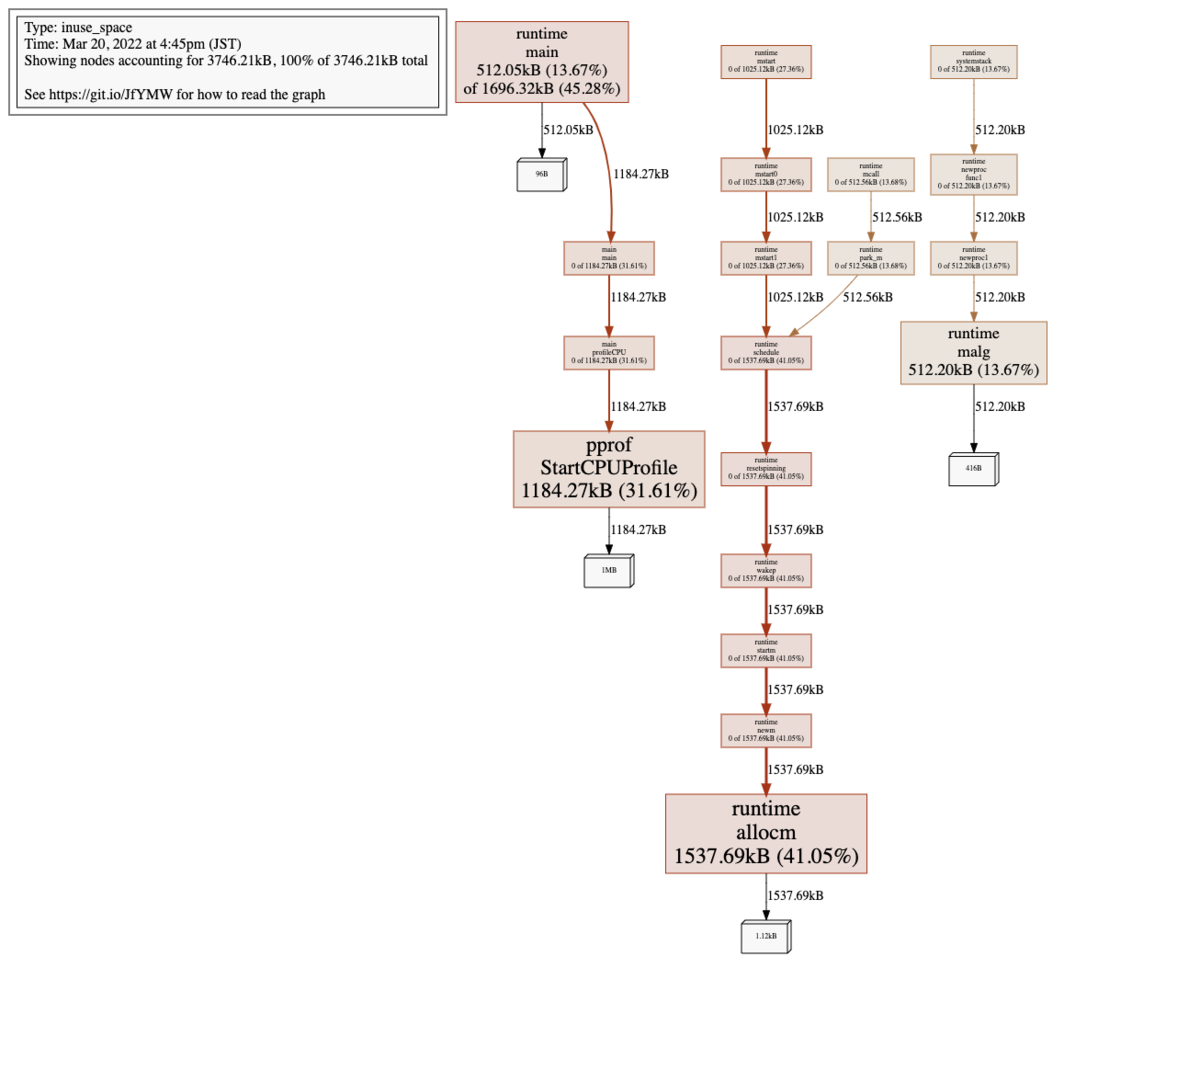
go tool pprof -web
net/http/pprof の項と同様、作成済みのpprofバイナリの結果をデフォルトWebブラウザ上で出力できます。
$ go tool pprof -web mem.pprof
またブラウザ上で http://{localhost}/debug/pprof/ を開くと、pprofの各プロファイル結果のページにアクセスすることができます。

インタラクティブモード
net/http/pprof ではendpointを指定していましたが、かわりに出力済みバイナリを指定することでもインタラクティブモードを開くことができます。
$ go tool pprof mem.pprof
Type: inuse_space
Time: Mar 20, 2022 at 4:45pm (JST)
Entering interactive mode (type "help" for commands, "o" for options)
(pprof)
その他のメモ
runtime/pprof はいくつかのOSにおいて正しい結果を出力できない様子。
$ go tools doc runtime/pprof
...
BUG: Profiles are only as good as the kernel support used to generate them.
See https://golang.org/issue/13841 for details about known problems.
例えばEl Capitan以前のOS Xだと以下のような誤ったスレッドに対しシグナルが送られるバグが報告されています。
OS X (fixed in OS X 10.11 El Capitan): Deliver signals to the wrong thread. On such systems, profiles are commonly very incorrect. See rsc.io/pprof_mac_fix for a workaround on those early systems.
プロファイリングする対象の環境ごとに予めチェックしてみると良いかもと思いました(仮想環境下だとまた変わったりするんだろうか)。
参考文献
【Go】S3互換local storageとしてMinIOを立ち上げてaws-sdk-go-v2から接続する
MinIOドキュメントに aws-sdk-go を使用したサンプルはあるのですが、 aws-sdk-go-v2 のものはないため備忘録を残しておきます。
MinIO
オープンソースのオブジェクトストレージです。 S3互換のため、S3 API経由で接続することができます。
MinIO の立ち上げ
Docker imageがあるのでこれを利用してserver用コンテナを立ち上げます。
$ docker container run -d --name minio -p 9000:9000 -p 9001:9001 minio/minio server /data --console-address ":9001"
MinIOには管理コンソールがあるので、アプリケーション用だけでなく管理コンソール用portも指定&forwardingします。
管理コンソールのportは --console-address で指定できます。指定しないとephemeral portが毎回ランダムに割り当てられてしまうので、明示的に指定したほうが楽です。
管理画面はブラウザ上でアクセスでき、credentialは↓で確認できます。credentialは環境変数 MINIO_ROOT_USER MINIO_ROOT_PASSWORD で設定できますが、特に指定がなければ minioadmin:minioadmin になります。
$ docker logs minio
API: http://172.17.0.2:9000  http://127.0.0.1:9000

Console: http://172.17.0.2:9001 http://127.0.0.1:9001

Documentation: https://docs.min.io
WARNING: Detected default credentials 'minioadmin:minioadmin', we recommend that you change these values with 'MINIO_ROOT_USER' and 'MINIO_ROOT_PASSWORD' environment variables
aws-sdk-go-v2でMinIOを叩く
import (
    "bytes"
    "context"
    "log"

    "github.com/aws/aws-sdk-go-v2/aws"
    "github.com/aws/aws-sdk-go-v2/config"
    "github.com/aws/aws-sdk-go-v2/credentials"
    "github.com/aws/aws-sdk-go-v2/service/s3"
)

func main() {
    ctx := context.Background()

    accessKey := "<access-key>"
    secretKey := "<secret-key>"
    cred := credentials.NewStaticCredentialsProvider(accessKey, secretKey, "")

    endpoint := aws.EndpointResolverFunc(func(service, region string) (aws.Endpoint, error) {
        return aws.Endpoint{
            URL: "http://localhost:9000",
        }, nil
    })

    cfg, err := config.LoadDefaultConfig(ctx, config.WithCredentialsProvider(cred), config.WithEndpointResolver(endpoint))
    if err != nil {
        log.Fatalln(err)
    }

    // change object address style
    client := s3.NewFromConfig(cfg, func(options *s3.Options) {
        options.UsePathStyle = true
    })

    // get buckets
    lbo, err := client.ListBuckets(ctx, nil)
    if err != nil {
        log.Fatalln(err)
    }
    buckets := make(map[string]struct{}, len(lbo.Buckets))
    for _, b := range lbo.Buckets {
        buckets[*b.Name] = struct{}{}
    }

    // create 'develop' bucket if not exist
    bucketName := "develop"
    if _, ok := buckets[bucketName]; !ok {
        _, err = client.CreateBucket(ctx, &s3.CreateBucketInput{
            Bucket: &bucketName,
        })
        if err != nil {
            log.Fatalln(err)
        }
    }

    // put object
    _, err = client.PutObject(ctx, &s3.PutObjectInput{
        Bucket: &bucketName,
        Key:    aws.String("hogehoge"),
        Body:   bytes.NewReader([]byte("Hello, MinIO!")),
    })
    if err != nil {
        log.Fatalln(err)
    }
}
aws-sdk-go-v2からMinIOを叩く際に考慮する点が1つあります。
オブジェクトアドレスをpath styleにする
S3にはpath style と virtual-hosted styleのアドレスがあります。path styleではバケット名がpathに含まれていましたが、virtual-hosted styleではURLドメインに含まれるようになります。
- path style:
https://s3-us-east-1.amazonaws.com/bucket-name/images/obj.jpeg - virtual-hosted style:
https://bucket-name.s3.amazonaws.com/images/obj.jpeg
AWS S3だと現時点でvirtual-hosted style のアドレスが使用されていますが、MinIOは対応していないのでpath styleでアクセスする必要があります。
path styleへの変更は s3.NewFromConfig に options.UsePathStyle=true 書き換えを行う func(options *s3.Options) を渡します。
client := s3.NewFromConfig(cfg, func(options *s3.Options) {
    options.UsePathStyle = true
})
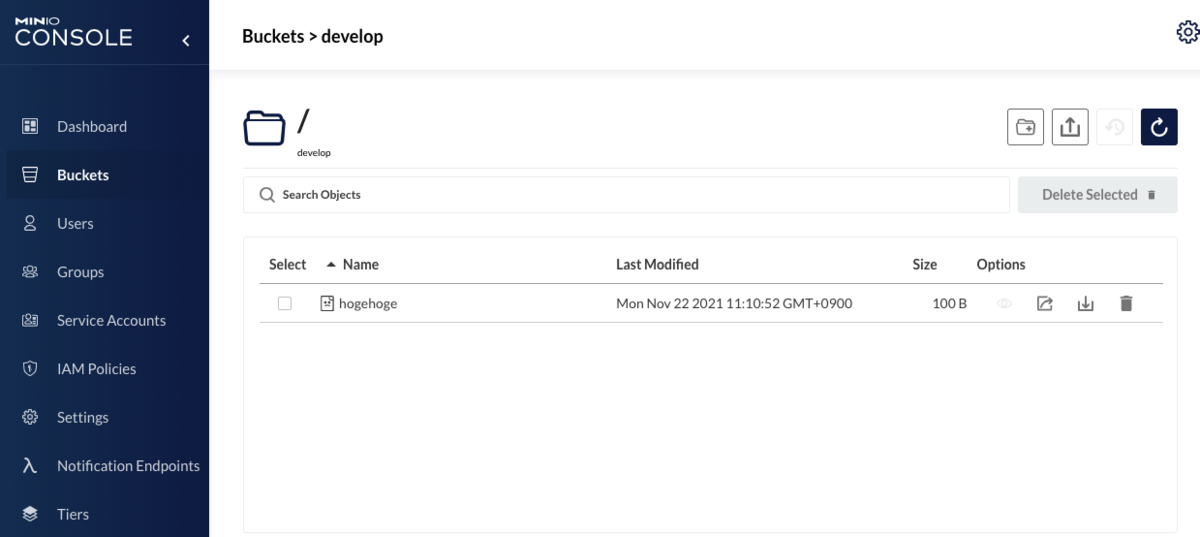
管理コンソール上でuploadされたオブジェクトを確認できます。
参考文献
【Go】aws-sdk-go-v2でio.Seeker未実装streamを使用してS3 objectをuploadする
aws-sdk-go-v2 でS3にオブジェクトをアップロードするには PutObject が利用できます。
引数となる PutObjectInput の Body fieldに、アップロードしたいオブジェクトコンテンツを io.Reader で渡すことができます。
例えば、下記例では bytes.Buffer 型の値を渡しています。
input := &s3.PutObjectInput{
    Bucket:        aws.String(bucketName),
    Key:           aws.String(key),
    Body:          bytes.NewBuffer(b) // b : object binary
}

resp, err := client.PutObject(ctx, input)
if err != nil {
    return err
}
ただしアップロードは失敗し、下記のようなerrorが返ってきます。
operation error S3: PutObject, failed to compute payload hash: failed to seek body to start, request stream is not seekable
error文言からは PutObject がペイロードのハッシュを計算するため、 Body に io.Seeker を実装したstreamを渡さなければいけないことがわかります。
bytes.Buffer は Seek(offset int64, whence int) (int64, error) を実装していないので失敗します。
// Seeker is the interface that wraps the basic Seek method.
//
// Seek sets the offset for the next Read or Write to offset,
// interpreted according to whence:
// SeekStart means relative to the start of the file,
// SeekCurrent means relative to the current offset, and
// SeekEnd means relative to the end.
// Seek returns the new offset relative to the start of the
// file and an error, if any.
//
// Seeking to an offset before the start of the file is an error.
// Seeking to any positive offset is legal, but the behavior of subsequent
// I/O operations on the underlying object is implementation-dependent.
type Seeker interface {
    Seek(offset int64, whence int) (int64, error)
}
このことは公式ドキュメントでも言及されています。
os.File など io.Seeker 実装型の値で渡せば問題ないのですが、 他の io.Reader で渡したい場合、明示的にコンテンツサイズを計算して渡してあげる必要があります。
具体的には
PutObjectInputに、ContentLengthを設定するPutObject第三実引数に、SwapComputePayloadSHA256ForUnsignedPayloadMiddlewareを渡したWithAPIOptions()呼び出しを設定する
とします。
input := s3.PutObjectInput{
    Bucket:        aws.String(bucketName),
    Key:           aws.String(key),
    Body:          bytes.NewBuffer(b),
    ContentLength: int64(len(b)), // 1.
}

resp, err := client.PutObject(ctx, input, s3.WithAPIOptions(
    v4.SwapComputePayloadSHA256ForUnsignedPayloadMiddleware, // 2.
))
if err != nil {
    return err
}
または、下記のようにUpload Managerを使用するとペイロードハッシュのことを考慮せずとも io.Reader を渡せます。
ただしこちらの方法を使用すると、PutObject APIではなくマルチパートアップロードが実行されるので注意です。
uploader := manager.NewUploader(client)
_, err = uploader.Upload(ctx, &s3.PutObjectInput{
    Bucket: aws.String(bucketName),
    Key:    aws.String(key),
    Body:   bytes.NewBuffer(b),
})
module version
github.com/aws/aws-sdk-go-v2 v1.11.1
github.com/aws/aws-sdk-go-v2/config v1.10.2
github.com/aws/aws-sdk-go-v2/credentials v1.6.2
github.com/aws/aws-sdk-go-v2/feature/s3/manager v1.7.2
github.com/aws/aws-sdk-go-v2/service/s3 v1.19.1
参考文献
【Golang】io.Pipeのr/wブロック
io.Pipe
io パッケージの関数 io.Pipe() は io.Writer を実装した PipeReader 、 io.Reader を実装した PipeWriter ポインタを返します。
PipeWriter.Write() で書き込みを行うと、その内容を PipeReader.Read() で読みこむことができます。
pr, pw := io.Pipe()

go func(w io.Writer) {
    s := []byte("string")
    if _, err := w.Write(s); err != nil {
        t.Error(err)
    }
}(pw)

b := make([]byte, 1024)
if _, err := pr.Read(b); err != nil {
    t.Error(err)
}
fmt.Println(b) // -> [115 116 114 105 110 103 0 ... ]
PipeReader PipeWriter 共々内部的には同じ pipe 型ポインタを持っていて、これを介してコンテンツを読み書きしています。
pipe.go
// A PipeReader is the read half of a pipe.
type PipeReader struct {
    p *pipe
}
...
// A PipeWriter is the write half of a pipe.
type PipeWriter struct {
    p *pipe
}
io.Pipe のr/wブロック
PipeReader.Read() PipeWriter.Write() は互いの操作をブロックします。すなわち PipeReader.Read() は PipeWriter.Write() が呼ばれるまでブロックされ、 PipeWriter.Write() もまた PipeReader.Read() が呼ばれるまでブロックされます。そのため上記の例ではgoroutineで非同期に PipeWriter.Write() を呼び、 PipeReader.Read() がブロックされることを防いでいます。
ではgoroutineを使用せず同期的に PipeReader.Read() あるいは PipeWriter.Write() を呼び出すとそのままプログラムの実行がstopするのか?と思いきやfatal errorで終了します。
pr, pw := io.Pipe()

s := []byte("string")
if _, err := pw.Write(s); err != nil {
    panic(err)
}

b := make([]byte, 1024)
if _, err := pr.Read(b); err != nil {
    panic(err)
}
fmt.Println(b)
fatal error: all goroutines are asleep - deadlock!

goroutine 1 [select]:
io.(*pipe).Write(0xc0000201e0, 0xc00001c09a, 0x6, 0x6, 0x0, 0x0, 0x0)
        /usr/local/go/src/io/pipe.go:94 +0x1e5
io.(*PipeWriter).Write(...)
        /usr/local/go/src/io/pipe.go:163
これは pipe が内部で保持するチャネルが入力待ちの状態に陥り、main goroutine含む全てのgoroutineがstopしてしまうために発生します。
pipe.go
func (p *pipe) Write(b []byte) (n int, err error) {
    select {
    case <-p.done:
        return 0, p.writeCloseError()
    default:
        p.wrMu.Lock()
        defer p.wrMu.Unlock()
    }

    for once := true; once || len(b) > 0; once = false {
        select {
        case p.wrCh <- b: // ここでp.wrChが出力可能になるまでブロック
            nw := <-p.rdCh
            b = b[nw:]
            n += nw
        case <-p.done:
            return n, p.writeCloseError()
        }
    }
    return n, nil
}

...

func (p *pipe) Read(b []byte) (n int, err error) {
    select {
    case <-p.done:
        return 0, p.readCloseError()
    default:
    }

    select {
    case bw := <-p.wrCh: // ここで入力可能になるまでブロック
        nr := copy(b, bw)
        p.rdCh <- nr
        return nr, nil
    case <-p.done:
        return 0, p.readCloseError()
    }
}
PipeReader.Read() PipeWriter.Write() がブロックされるのは、内部のチャネルのブロックによるものでした。
こうして見ると、 io.Pipe 関数はチャネルによるgoroutine間の []byte I/Oを抽象化するWrapperのようにも感じます。
nits
中間にバッファを介せば、一応同期的にr/w処理を分けることができます。バッファ分のメモリ容量を必要としますが...
buf := bytes.Buffer{}

s := []byte("string")
if _, err := buf.Write(s); err != nil {
    t.Error(err)
}

b := make([]byte, 1024)
if _, err := buf.Read(b); err != nil {
    t.Error(err)
}
fmt.Println(b)